Hello everyone.
Today we will continue to study the blog construction of personal webmaster exploration.
Personal blog advantages:
- freedom
- archive your knowledge
- global perspective
However, none of the above is necessary hah. What prompted me to set up blog was that it was simple and free. In just five minutes i could build it using Github and Vercel.
In this article you can see how to build a blog using Hugo(PaperMod theme), Github content management, Vercal static hosting, custom domain, Google analytics, comments and advertising.
small fork: builds with one click by Vercel
Github authorizes vercel, create a team, create a project, search Hugo template and clone it. After a short wait, you can access it though the domain name in the Domains provided by the Vercel project. At the same time, the Hugo project will be created in Github, and then the content can be written according to the Hugo docs.
MacOS local env setup
Of course, when we write the content later, we need to see the effect locally before we publish it. Sure you can also read the Hugo guide
install Hugo
brew install hugo
# or
sudo port install hugo
verify
hugo version
# hugo v0.125.2-4e483f5d4abae136c4312d397a55e9e1d39148df+extended darwin/arm64 BuildDate=2024-04-20T15:29:44Z VendorInfo=brew
and we need install git, learn git
create a new blog in local
--format yaml it is the format of the configuration file. The default is .toml. You can choose it according to your personal preference.
hugo new site MyFreshWebsite --format yaml
# replace MyFreshWebsite with name of your website
Enter the ‘MyFreshWebsite’ directory, install theme(PaperMod), Using themes through git modules, We cannot and should not actively modify the files of the theme project, this way you can stay up to new.
cd MyFreshWebsite

# download theme resources
git init
git submodule add --depth=1 https://github.com/adityatelange/hugo-PaperMod.git themes/PaperMod
git submodule update --init --recursive # needed when you reclone your repo (submodules may not get cloned automatically)

# add theme dependencies
echo "theme: ['PaperMod']" >> hugo.yaml
and we can start it.
hugo server
The hugo command can build static resources directly locally. It should be noted that public ist the product after construction, in other words, there is no need to manage and upload Github separately.
deploy to Vercel
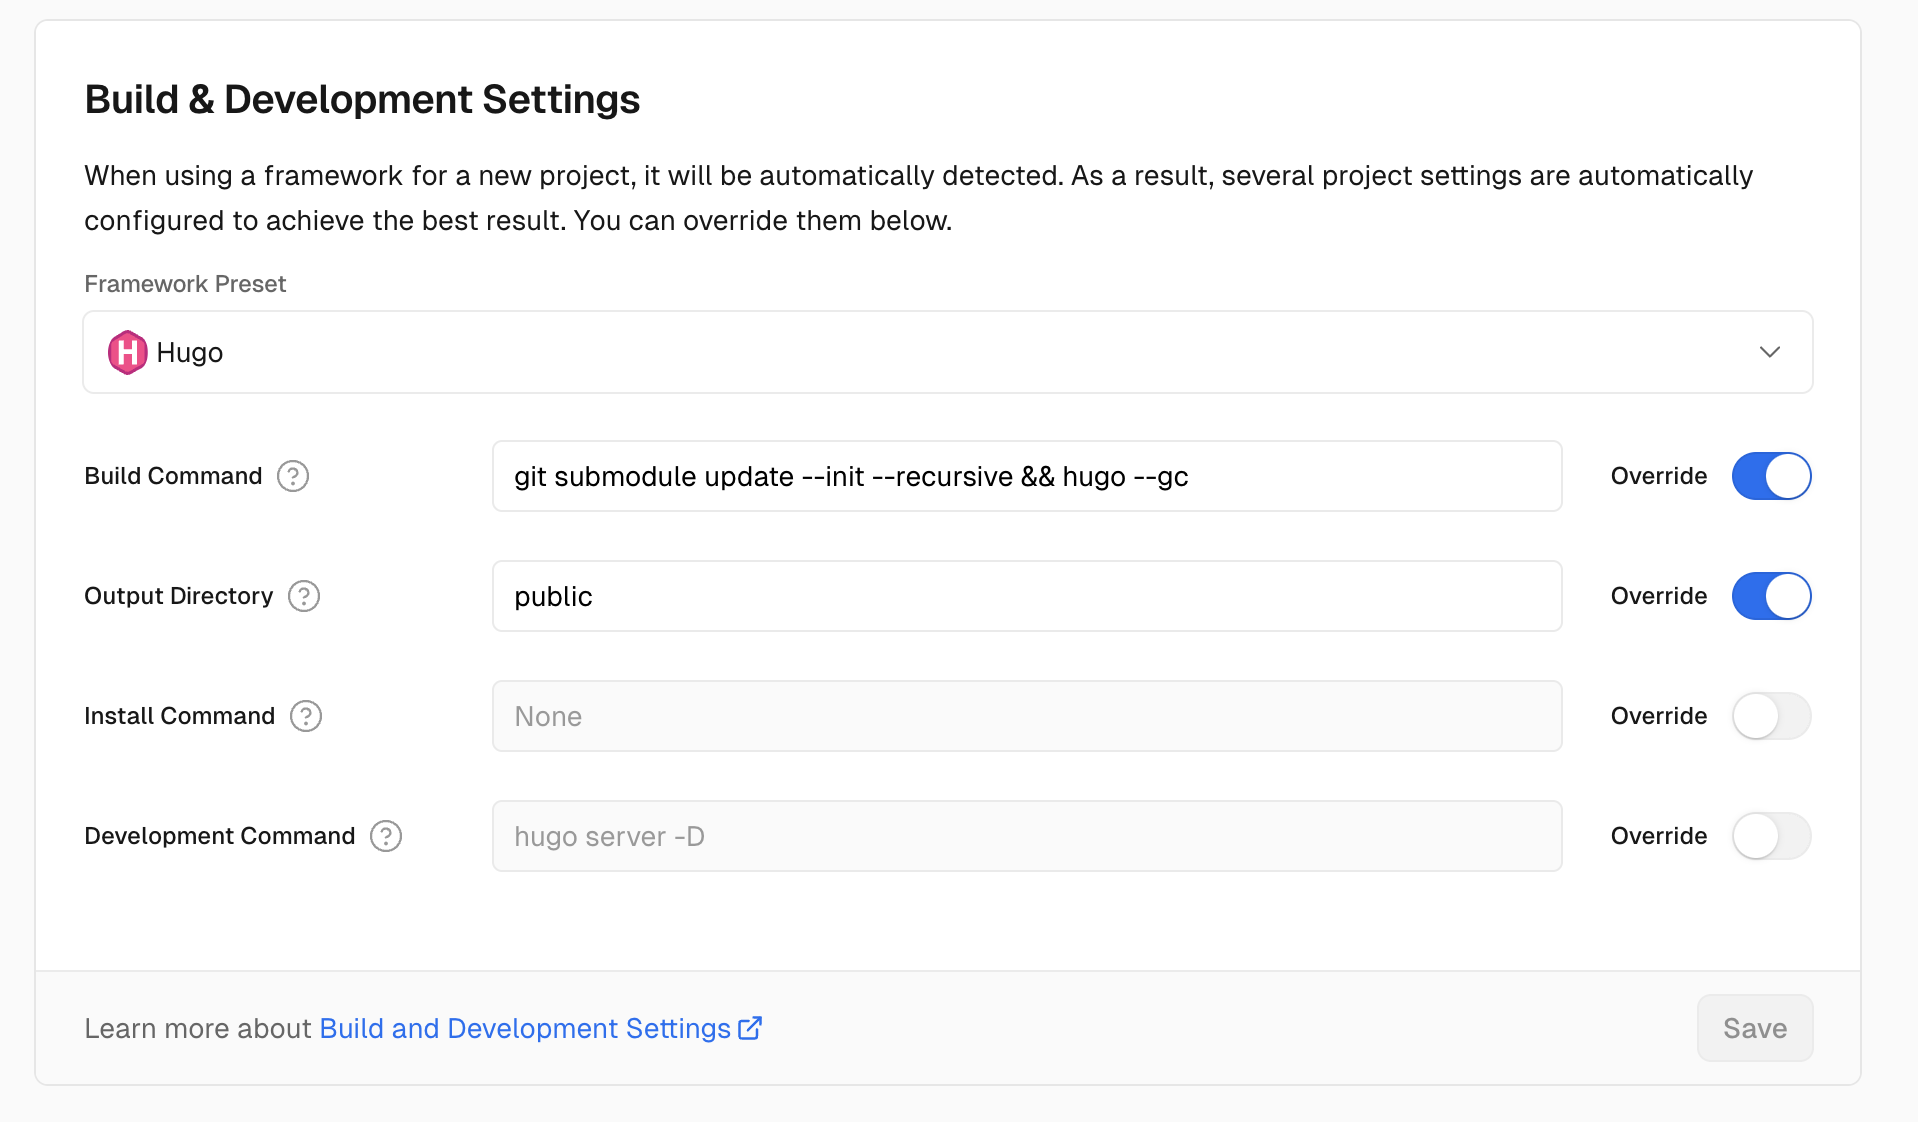
Without using the Vercel template, create a new project in Vercel and choose to import from Github(Import Git Repository), build command is set to git submodule update --init --recursive && hugo --gc. Above, our theme is used through the git module, which leads to problem: theme download may fail when building Vercel project. But, even if fails, it can be built and deployed successfully, an xml error message will appear when accessing the blog, similarThis XML file does not appear to have any style information associated with it. The document tree is shown below.. So we reset this build command.
 In addition, inconsistent Hugo versions can alse cause xml problems. It is recommended to increase the
 HUGO_VERSION environment variable settings.
Immediately afterwards, we will encounter another problem during the first build.
Skipping build cache since Node.js version changed from "18.x" to "20.x"
Running "vercel build"
Vercel CLI 33.7.1
sh: line 1: hugo: command not found
Error: Command "hugo --gc" exited with 127
We provide a package.json file in the root directory here to limit the version to the range.
{
  "engines": {
    "node": "18.x"
  }
}
push code it will rebuild.
At this point, we have our own blog and our own website ✿✿ヽ(°▽°)ノ✿。
GoogleAnalytics
It’s so easy, just get your id.
# ...
services:
  googleAnalytics:
    id: G-xxx
# ...
successful verification
On the blog page, open the console(chrome f12) and filter the infomation about the gtag file download under the network option. Or deploy it and see data reports on Google console.
custom domain
Although Vercel will provide the domain name, but it is not yours. Not so easy for visitors to remember.
We can buy a cheap domain name at any registrar for the price of a piece of bread, making your blog look more formal, and make be can making you happier, is not cost /doge.
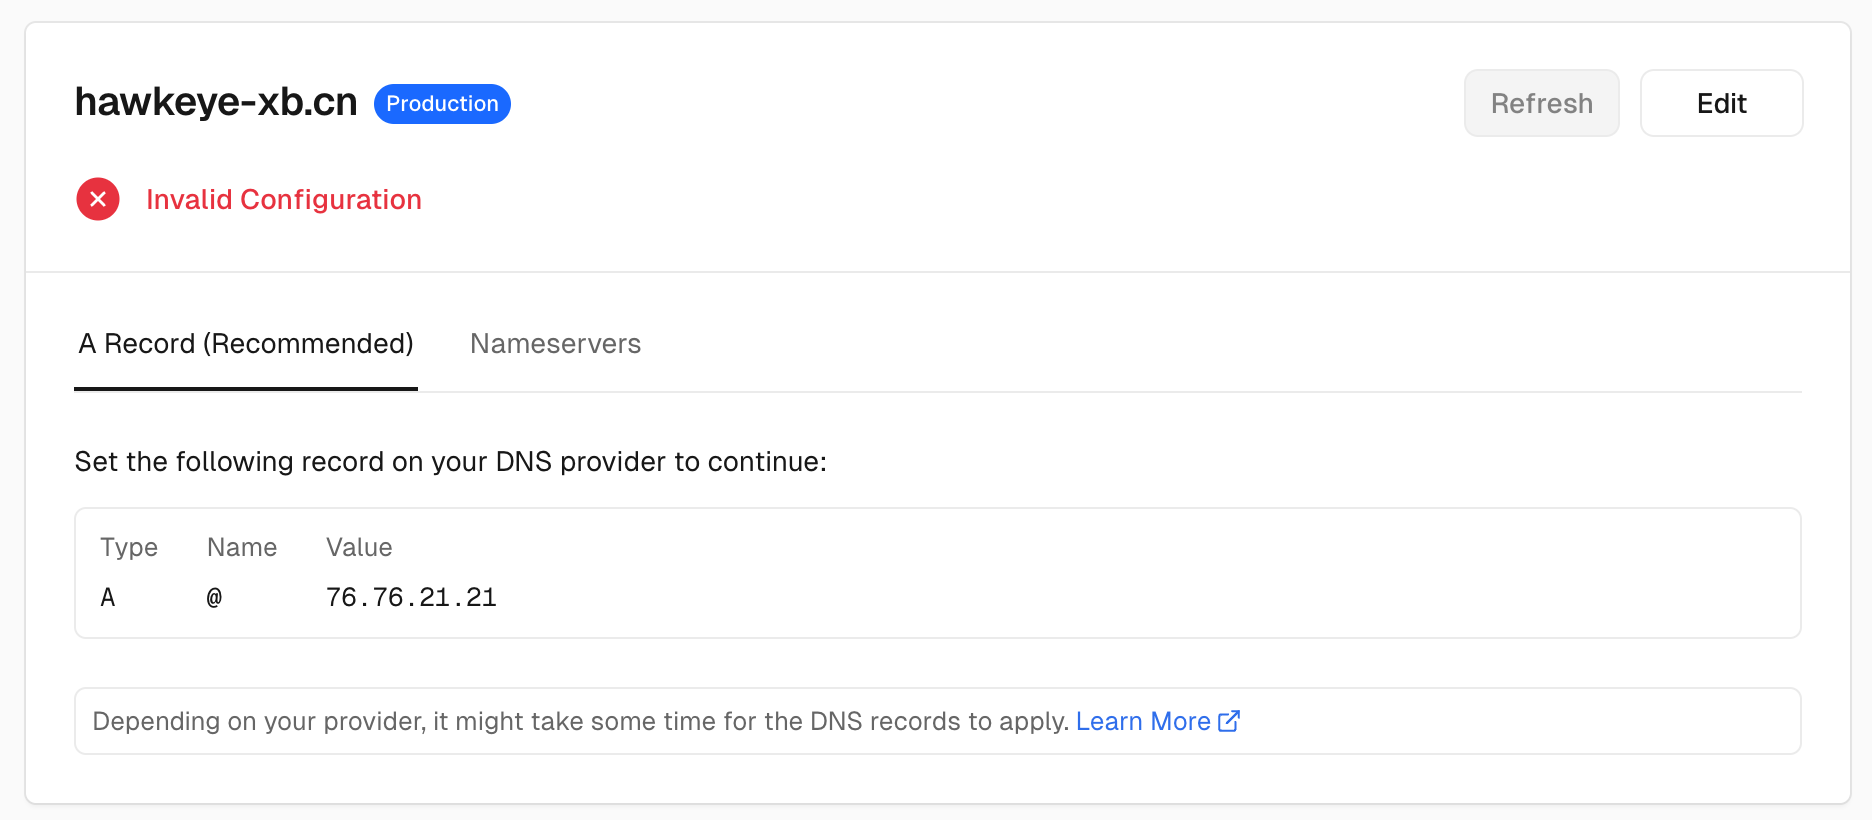
After the domain name is successfully registered, it takes time(within 48 hours) to be distributed to various DNS servers. But we can go to the corresponding domain name registrar(where it was purchased) and add resolution information to the target server(Vercel), which is the address given by Vercel, as shown below: 76.76.21.21.
Google Search Console verify ownership is the same as this.
Waiting for a while, you can set up a custom domain name and access your blog through your favorite domain name.

comments
Some people like the comment function and some don’t, here is a quick and easy way to integrate, giscus, using the Github Discussion. It’s free! /doge
Using giscus
- Check this item in the project settings and select Github Discussions.
- Make the project public to allow access to comment data.
- Install giscus to Github project.
- Copy the script information generated by giscus.
- Set up config.
- Copy script code into
layouts/partials/comments.html. - Params add comments: true(yaml), as follows:
params:
  comments: true
Google ads
No permission yet. 🕊🕊🕊
finally
I hope these five minutes today will be helpful to you/doge。